There are five main status groups in Fellowship One—Attendee, Member, Inactive, Deceased and System. Within these status groups, you will find several pre-configured statuses you can use when creating individual records. Statuses are typically used as an indicator of a person's relationship at the church.
Note: The statuses that come with Fellowship One may not be modified or deactivated. If at all possible, it is best to use these statuses in conjunction with any additional statuses you may want to add.
Fellowship One requires that a status be assigned to every person. You can create custom statuses and sub-status types to further explain a person's status. For example, you may want to create a status called "Visitor" to add to the "Attendee" status.
Sub-statuses are optional and meant to provide extra functionality to further explain a status. For example, you can create a sub-status for "Visitor" called "Invited", meaning anyone with this status/sub-status combination is a visitor because he or she was invited by someone who attends the church.
A typical use of sub statuses is to explain membership or how a person became a member of the church. For example, "Transfer of Membership", "Baptism", "By Letter", "Membership Class", and so on.
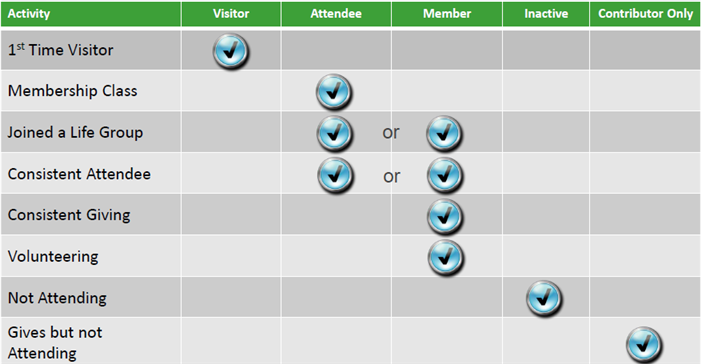
Before you begin adding new statuses, you should create a plan for what each status means to your church and when it should be applied to an individual record. This could be as simple as a table grid that shows a common occurrence at your church an the status that is typically applied when the occurrence happens.
When you have developed your status plan, make sure you hand it out to all people responsible for maintaining individual records.
When you have decided which statuses you may need to add to the ones that exist.
To create a new status and sub-status:
You can add sub statuses to any existing status to further define the status. The sub status field becomes a drop-down list that appears when applying statuses to an individual's record. The sub status drop-down only appears when a status is selected that has a sub status.
To add a sub status:
Three special statuses are configured and are used exclusively by Fellowship One. An important thing to notes is that none of the System statuses are selected by default when running reports. Always double check the selected statuses if a report you are running includes a status filter. If you leave the System statuses out of the filter you may be missing a significant portion of your records in the report results.
These statues are as follows:
A good practice for cleaning up these statuses is described in Updating Visitor Statuses.